Chocolate Pine Cones Recipe
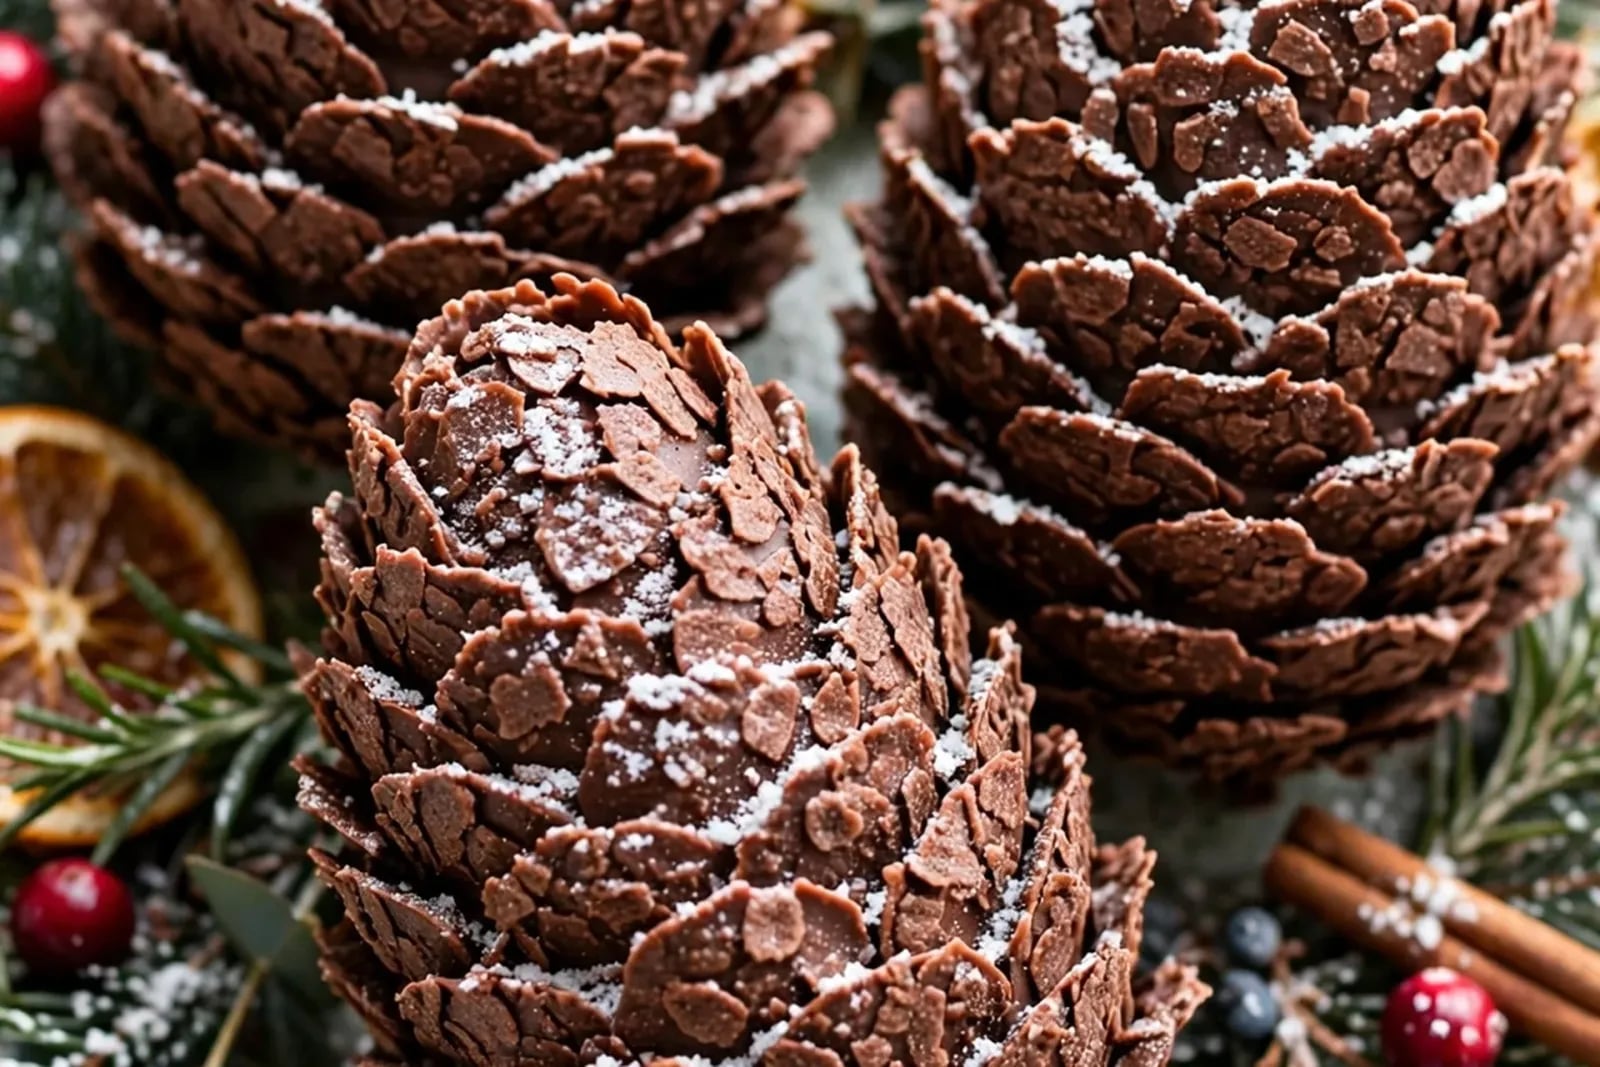
Chocolate pine cones are the viral TikTok dessert of this Christmas. A rich chocolate ganache filling, shaped into pine cones and coated in chocolate cereal flakes, looks like it fell off a winter tree. No baking, just chilling, shaping and a little patience.
 Desserts
This Chocolate Pine Cones Recipe is the viral TikTok dessert of this Christmas, and it is easy to see why. A rich chocolate filling, made from crushed chocolate cookies and cream cheese, is shaped into pine cones and coated in chocolate cereal flakes that look exactly like pine cone scales.
For more no bake Christmas treats, try our Eggnog Truffles, our Christmas Pavlova and our Brown Butter Maple Cream Pie.
What Makes This Chocolate Pine Cones So Good
The magic is in the look. Each pine cone is built from a fudgy chocolate centre and a coat of overlapping cereal flakes that catch the light like real scales, and the effect is so convincing that guests pick them up to look at them before they eat them. The first bite is pure chocolate, rich and fudgy with a crisp, crunchy shell, and the contrast is what makes them so satisfying.
It is also a wonderfully forgiving project. There is no baking, no tempering and no special equipment, just a bowl, a tray and a little patience while the filling chills. Kids love helping with the shaping and the flake layering.
The Key Ingredients
A short list of simple ingredients builds the whole batch.
The Chocolate Cookies
Chocolate sandwich cookies, crushed to fine crumbs, are the base of the filling. Use the whole cookie, filling and all, since the cream centre helps bind the mixture and adds sweetness. Crush them in a food processor for the finest crumbs.
The Cream Cheese
Softened cream cheese binds the cookie crumbs into a firm, fudgy mixture that holds its shape. It also adds a gentle tang that keeps the chocolate from tasting too sweet.
The Chocolate Cereal Flakes
Chocolate cereal flakes are what make the pine cones look real. Choose a flaked cereal with thin, curved pieces, and sort out the broken bits so you only use whole flakes. Each flake is pressed into the filling at a slight angle, overlapping like scales.
The Cocoa and Powdered Sugar
A little cocoa powder deepens the chocolate flavour of the filling, while powdered sugar dusted over the finished pine cones looks like fresh snow. Dust the sugar just before serving so it stays bright and white.
How to Make Chocolate Pine Cones
Chill the filling before you shape it. A firm mixture holds its point and takes the flakes cleanly.
- Crush the cookies: crush the chocolate sandwich cookies to fine crumbs in a food processor.
- Mix the filling: beat the cream cheese until smooth, then mix in the cookie crumbs and cocoa powder.
- Chill until firm: refrigerate the mixture for 30 minutes, until firm enough to shape.
- Shape the cones: divide the mixture into 8 portions and shape each into a cone with a pointed top.
- Chill again: refrigerate the shaped cones for 15 minutes so they hold their shape.
- Add the flakes: press chocolate cereal flakes into each cone at an angle, starting at the bottom and working upward.
- Overlap the rows: layer each new row over the last, so the flakes look like pine cone scales.
- Dust and serve: dust with powdered sugar and add a small pretzel stick as the stem.
Mistakes to Avoid
Shaping a Soft Mixture
A warm, soft filling slumps under the weight of the flakes and loses its point. Chill the mixture for at least 30 minutes before shaping, and chill the shaped cones again before adding the flakes.
Using Broken Cereal Flakes
Broken flakes look messy and do not overlap neatly, which ruins the pine cone effect. Sort through the cereal first and set aside the whole, curved flakes for the outside. Save the broken pieces for the bottom layer, where they will not be seen, or crush them into the filling.
Pressing the Flakes Flat
Flakes pressed flat against the cone look like a coating, not scales. Press each flake in at a slight upward angle, with the bottom edge tucked under the row above it. The angle is what creates the layered, scaly look that makes these pine cones so convincing.
What to Serve with Chocolate Pine Cones
These pine cones are rich and chocolatey, so they pair best with something light or creamy alongside:
- Hot chocolate or coffee, for a cosy Christmas dessert moment
- Whipped cream, for a soft, light contrast to the fudgy centre
- Fresh berries, for a tart, bright bite beside the sweet chocolate
- A Christmas cookie platter, where the pine cones become the centrepiece
Make It Your Own
The recipe welcomes small changes. Add a spoonful of peanut butter to the filling for a nutty version, or stir in a little orange zest for a chocolate orange flavour. For a minty version, add a few drops of peppermint extract to the filling.
Make This Chocolate Pine Cones Today
Fudgy chocolate, crunchy flakes and a shape straight off a winter tree make this the no bake dessert your Christmas table will be photographed for. Chill it, shape it and layer it up. Browse more of our Desserts recipes for more holiday treats.
Recipe card
Chocolate Pine Cones Recipe
Chocolate pine cones are the viral TikTok dessert of this Christmas. A rich chocolate ganache filling, shaped into pine cones and coated in chocolate cereal flakes, looks like it fell off a winter tree.
- Prep
- 30 mins
- Total
- 30 mins
- Serves
- 8
- Course
- Dessert
- Cuisine
- American
- Calories
- 310 kcal
Ingredients
0/6 ready · tap to tick off
Equipment
- Food processor
- large mixing bowl
- baking sheet
- parchment paper
Method
Tap a step when it’s done.
Nutrition
310 kcal
Calories
4 g
Protein
36 g
Carbs
17 g
Total Fat
2 g
Fibre
22 g
Sugar
210 mg
Sodium
* Values are estimates.
Notes
- Chill the mixture before shaping so the cones hold their point.
- Use whole, curved cereal flakes for the neatest scales.
- Press the flakes in at an angle so they overlap like scales.
- Dust with powdered sugar just before serving.
- Leftovers keep covered in the fridge for up to 4 days.
Tips for success
- Crush the cookies finely so the filling is smooth.
- Wet your hands lightly when shaping the cones.
- Work in batches and keep the rest chilled.
- Start the flakes at the bottom and work upward.
- Save broken flakes for the bottom layer.
- Serve on a bed of greenery for a woodland look.